What happened in May 2020 at the Westburary Hemp House build? Well Autumn came and went. The days became an awful lot shorter and colder. The house progresses but it seems to us at a snails pace. Owner building is a strange beast. I have seen new houses started, finished, sold, and people move in whilst we have been building. We are still building and it seems, sometimes, that we are the slowest builders on the planet. Still things have moved forwards.
During the month of May, when I was supposed to be visiting my parents in the UK for their 60th wedding anniversary: Thanks Covid!!, the following was achieved.
- Bathroom shelf created
- Roller doors installed
- lining of carport continues
- Internal rendering completed
- Bathroom waterproofing and tiling done
- Rendering of sunroom finished
- Plugging of screw holes in window surrounds started
- Ceiling paint exploration
- Completion North wall rendering
- South wall first coat of render
Bathroom shelf:
At the beginning of May I decided to tackle the strange journey of a shelf in the bathroom. A couple of years ago I was left a slab of timber, Blackwood I think, by a friend of mine. I decided that it would be a perfect unusual shelf in the bathroom.

It was a very uneven piece of timber along both of its edges and as such a custom bracket would have to be designed. When the house was being framed I had allowed for three support brackets at points where the timber shelf touched the wall. These were attached to the house frame before hemping started.
All the components of the shelf were made from bits and pieces I had lying around. A length of angle iron that was in the scrap pile took the weight of the shelf as it had a very thin spot that may have broken. This was welded to right angle brackets I made from yet other angle iron that was laying neglected next to the garage.
After much measuring, angle grinding and welding the bracket was finished and made to sit level in slots cut into the timber slab. Next was to sand the slab with the belt sander. WOW … the timber looks amazing. Once sanded to 240 grit and then oiled with Osmo wood protector oil and then two coats of Osmo Polyx oil it looks fantastic. Osmo is a German company that makes a range of brilliant natural wax and oil finishes for timber.
The shelf will have two towel rails hanging from the metal support bracket. yet again upcycled from a couple of lengths of timber given to me by the same friend.

towel rail timbers to be upcycled 
timber slab for bathroom shelf 
sanding the top 
awesome grain
Roller doors:
After ordering the B & d roller doors from Garage Door Solutions, Launceston back in early April they finally arrived and GDS came and installed them to make secure the two storage areas that were part of the original design brief. One is at the back of the carport and the other built into the south side of the workshop.
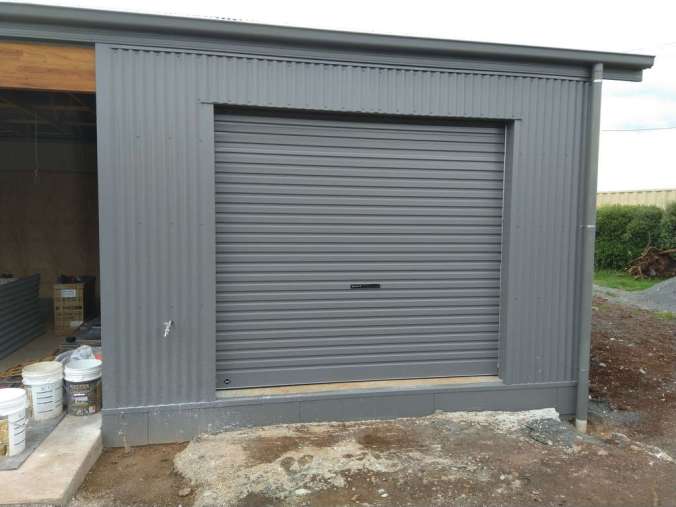
roller doors
Bathroom:
We decided to get somebody to do the waterproofing and tiling in the bathroom rather than tackle it ourselves. that way the waterproofing is down to the licensed builder and it will not come back on us if there are any problems (which there shouldn’t be).
Through our plumber Clinton of CDR plumbing, Deloraine we were put in touch with Josh from Skulpt Constructions. Yet again our ethos of using local where possible, Josh is from Deloraine (17km’s away).
Mandy and I already had the tiles for the floor and one wall. These are large (900mm x 450mm) Italian porcelain tiles in a dark grey that I brought as a job lot from Hobart a couple of years ago when looking for just a few tiles to do a laundry floor. Ended up with about 100 square meters or more. What we needed was some colour for the back of the shower. Well it appears that the only colours that Tasmanians are likely to buy are black, white, grey, beige, or any combination of the above. Very little else in a big tile. We wanted big tiles as that means less grout to clean. Eventually we found tiles made in Australia (Melbourne in fact) that came in a range of colours and textures. Made by Southern Cross Ceramics they are made to order and whilst not cheap add a great splash of colour to the bathroom. The range is called Infinity Geo and the colour is Ming
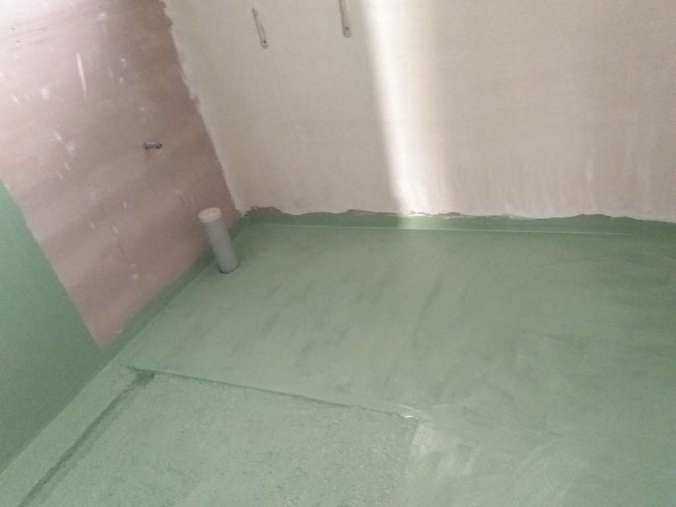
Davco K10 waterproofing 
Floor tiles down 
Shower wall tiled 
Vanity bench attached temporarily 
Walls and ceilings painted with Resene 
Infinty Geo tiles
So sustainability wise bathrooms are a little difficult because of the waterproofing that has to be used. Here is a list of products and how sustainable I think they are and why
- Grey tiles – sustainable – recycled
- Colour tiles – sustainable – Australian made (Melbourne)
- waterproofing – not sustainable – used Davco K10, available Bunnings
- Toilet – Sustainable- WELS 4 Star – 4.5L Full/3L Half/3.3L Average Flush – Harpers Bathrooms Meyer Tornado
- All bathroom plumbing fixtures are stainless steel. No chrome. See this link for more info regarding stainless steel v chrome or brass
- Shower diverter – we are having one fixed shower head and one hand held – Caroma Titan stainless steel
- Fixed shower arm and head – Caroma Titan shower arm, Methven Kiri Satinjet low flow shower rose Methven Turoa Vjet Hand shower
- Recycled hardwood timber vanity and Harpers Prague semi recessed sink – Vanity will have drawers each side with space between to house sink. Easy to sit at sink if needs be,
Carport: Attic wall cladding
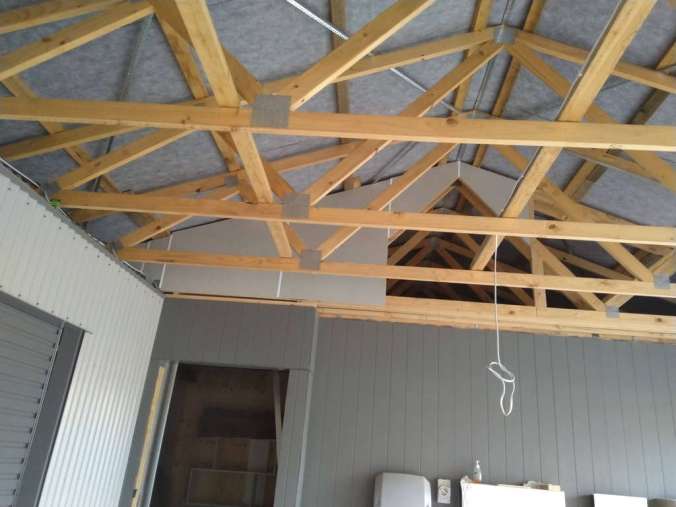
cladding the shed apex 
cladding the house apex 
Ryan and offending screw 
Murphy’s law !!
Ryan has kept on with the carport cladding. Finishing up the rear wall cladding he had the misfortune to snap a tech screw head off. Once the colorbond cladding piece was removed it was easy to see that somehow he had managed to hit a bugle screw absolutely dead centre and embed the tech screw into it. We ended up cutting out the timber and bugle and replacing it.
Once the cladding was reinstated that finished off the walls under the carport and Ryan then turned his attention to cladding the apex of the house and the shed with cement sheet. We decided to leave an entry way into both buildings for ease of access. These will have doors made eventually.
Plugging the holes.
When the windows and doors were fitted Andrias used a countersink bit to drill the holes for the fixing screws. The holes could then be filled with wooden plugs cut from the same kind of timber. in this case Tasmanian Oak. I bought a Charon 1/2″ plug cutter from Bunnings and started to cut plugs. These I glued into place. Unfortunately I used the plug cutter in a cordless drill and it tended to burn its way through the timber. When glued in and cut flush you could see a dark ring around the edge of the plug. I tried the same cutter in my drill press on a slow speed with the same effect.
I then bought a more expensive plug cutter from Total Tools. An American brand called Snappy This worked really well when used at slow speed in a drill press. A squirt of silicon spray as it was drilling the hole helped immensely.
These plugs were tapped in after cleaning up the hole with a craft knife. The excess cut off with a pull saw and the whole of the timber window surround sanded and oiled with Osmo Polyx oil.

look hard to see the plug!! 
Can you see the wooden plug?
